

Configure & Manage Data Guard Using Data Guard Broker (DGMGRL)
Oracle 19c Data Guard Series
This article is Part 2 of a 3-part Oracle 19c Data Guard series, based on my hands-on lab implementation.
The series covers the complete journey from building a Physical Standby database to managing and testing Data Guard role transitions.
📌 Series Roadmap
Part 1 — Build It – Physical Standby & Active Data Guard
➡️ In Part1, I configured the Physical Standby database, RMAN Active Duplicate, Redo Transport, Redo Apply and READ ONLY WITH APPLY.
Part 2 — Manage It – Data Guard Broker — Configure, Enable & Validate
➡️ In this second article, I am continuing with the same environment and configuring Oracle Data Guard Broker using DGMGRL, adding the standby database, enabling the Broker configuration, and validating the environment.
Part 3 — Test It – Switchover, Failover & Reinstatement
➡️ Covers planned Switchover, Failover testing, handling the former primary database, Reinstatement, and final Data Guard validation.
Introduction
Building a Physical Standby is only the first milestone. The operational challenge is making sure the environment can be monitored consistently, managed predictably, and trusted when a role transition is required. That is where Oracle Data Guard Broker becomes important. Oracle positions Broker as the framework that manages the Data Guard configuration as a single unit, coordinating redo transport, apply services, health monitoring, properties and role changes through DGMGRL or Enterprise Manager.
The goal is to move from manually managing individual Data Guard parameters and operations to a Broker-managed configuration that can be monitored and administered through DGMGRL.
Environment
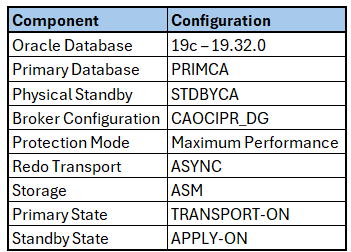
The configuration used in this lab is:
📂 Detailed Installation Commands & Output
This article focuses on the deployment approach, important configuration steps, troubleshooting and validation.
For readers who want to review the complete installation commands and actual command execution output, I have published the detailed command/output log separately on GitHub:
👉 Complete Oracle 19c Data Guard Broker Configuration Commands
1. Enable Flashback Database
Before configuring the Broker, I enabled Flashback Database on both the Primary and Standby.
Primary
ALTER DATABASE FLASHBACK ON;Standby
ALTER DATABASE FLASHBACK ON;Why enable Flashback?
Flashback Database becomes especially important when Data Guard is used for role transitions and reinstatement.
For example, following certain failover scenarios, Broker can use Flashback Database as part of reinstating a former Primary database rather than requiring the database to be rebuilt from scratch.
In my environment, Flashback was enabled successfully on both databases before proceeding with the Broker configuration.
2. Configure Data Guard Broker Configuration Files
Data Guard Broker maintains configuration information in Broker configuration files.
I explicitly configured two Broker configuration files and placed them in separate ASM diskgroups.
Primary — PRIMCA
ALTER SYSTEM SET DG_BROKER_CONFIG_FILE1='+DATA/PRIMCA/DATAGUARDCONFIG/dgb_config01.ora' SCOPE=BOTH;

ALTER SYSTEM SET DG_BROKER_CONFIG_FILE2='+FRA/PRIMCA/DATAGUARDCONFIG/dgb_config02.ora' SCOPE=BOTH;
Verify:
SHOW PARAMETER DG_BROKER;At this point, the files were configured but:
dg_broker_start = FALSEThe Broker background process was therefore not yet enabled.
Enable Broker
ALTER SYSTEM SET DG_BROKER_START=TRUE SCOPE=BOTH;Verify again:
SHOW PARAMETER DG_BROKER;The expected value is:
dg_broker_start = TRUEThe same configuration was then performed on the Standby database, using the corresponding STDBYCA ASM paths.
Why two Broker files?
DG_BROKER_CONFIG_FILE1 and DG_BROKER_CONFIG_FILE2 provide two copies of the Broker configuration information.
In this environment I placed them in:
+DATA
+FRA
This keeps the two Broker configuration files on separate ASM diskgroups rather than placing both copies in the same location.
3. Reset LOG_ARCHIVE_DEST_2 on the Standby
On the Standby database, I reset the manually configured LOG_ARCHIVE_DEST_2:
ALTER SYSTEM RESET LOG_ARCHIVE_DEST_2 SCOPE=BOTH;Why was this done?
The Physical Standby environment in Part 1 was initially configured using manual Data Guard parameters.
Once Broker is introduced, the intention is to allow Broker to manage the Data Guard configuration rather than retaining conflicting manual redo transport settings.
This step was performed on the Standby only in my lab.
4. Connect Using DGMGRL
With Broker enabled on both databases, the next step was to connect to the Primary using DGMGRL.
dgmgrl sys/**********@PRIMCA as sysdbaThe environment reported:
DGMGRL for Linux: Release 19.0.0.0.0
Version 19.32.0.0.0

Connected to "PRIMCA"
Connected as SYSDBA.
For public scripts or GitHub repositories, passwords should always be replaced with placeholders rather than included in command history or uploaded files.
5. Create the Data Guard Broker Configuration
I created the Broker configuration with the Primary database as its initial member:
CREATE CONFIGURATION 'CAOCIPR_DG'
AS PRIMARY DATABASE IS 'PRIMCA'
CONNECT IDENTIFIER IS PRIMCA;
The result:
Configuration "CAOCIPR_DG" created
with primary database "PRIMCA"
Next, add the Physical Standby:
ADD DATABASE 'STDBYCA'
AS CONNECT IDENTIFIER IS STDBYCA
MAINTAINED AS PHYSICAL;
Result:
Database "STDBYCA" addedAt this stage Broker knows the relationship:
CAOCIPR_DG
   |
   +-- PRIMCA   [Primary]
   |
   +-- STDBYCA  [Physical Standby]
The actual configuration and standby addition completed successfully in the lab.
6. Review the Configuration Before Enabling It
Before enabling the configuration, I checked it using:
SHOW CONFIGURATION VERBOSE;Broker correctly identified:
Configuration - CAOCIPR_DG

Protection Mode: MaxPerformance

Members:
  PRIMCA  - Primary database
    STDBYCA - Physical standby database
However, an important detail at this stage was:
Configuration Status:
DISABLED
This is expected because creating the Broker configuration does not mean that it has already been enabled.
The output also showed:
Fast-Start Failover: DisabledFast-Start Failover was not configured as part of this implementation.
7. Enable the Data Guard Broker Configuration
Enable the complete configuration:
ENABLE CONFIGURATION;Then verify:
SHOW CONFIGURATION VERBOSE;The important change was:
Configuration Status:
SUCCESS
This confirms that Broker successfully recognized and validated the Data Guard configuration.
In my test, the protection mode remained:
MaxPerformanceand Fast-Start Failover remained disabled, which is expected because FSFO was not part of this configuration.
8. Enable the Individual Databases
I also explicitly enabled both database members:
ENABLE DATABASE PRIMCA;
ENABLE DATABASE STDBYCA;
The configuration was then checked again:
SHOW CONFIGURATION VERBOSE;The result remained:
Configuration Status:
SUCCESS
At this point the Broker configuration and both database members were enabled and being managed through Data Guard Broker.
9. Validate the Primary Database
Next, I checked the detailed Broker information for the Primary:
SHOW DATABASE VERBOSE PRIMCA;Important values from the output were:
Database - PRIMCA

Role:           PRIMARY
Intended State: TRANSPORT-ON

LogShipping:    ON
LogXptMode:     ASYNC
And finally:
Database Status:
SUCCESS
What does this tell us?
PRIMARY confirms that Broker recognizes the current database role correctly.
TRANSPORT-ON indicates that redo transport is intended to remain active from the Primary.
ASYNC corresponds to the redo transport mode being used in this Maximum Performance configuration.
The Broker output also provides useful operational information including the alert log and Data Guard Broker log locations.
10. Validate the Physical Standby
Finally, I validated the Standby:
SHOW DATABASE VERBOSE STDBYCA;The output showed:
Role:               PHYSICAL STANDBY
Intended State:     APPLY-ON

Transport Lag:      0 seconds
Apply Lag:          0 seconds

Real Time Query:    ON
LogShipping:        ON
LogXptMode:         ASYNC
And:
Database Status:
SUCCESS
This is an important final validation.
APPLY-ON confirms that Broker expects redo apply to remain active.
Transport Lag: 0 seconds indicates there was no reported redo transport lag at the time of the test.
Apply Lag: 0 seconds indicates that the Standby had applied the received redo without reported lag at that point.
Real Time Query: ON confirms the Active Data Guard state in this lab — the Standby is available for read-only access while redo apply continues.
Final Data Guard Broker State
After completing the configuration, the environment reached the following state:
                CAOCIPR_DG
                     |
              MaxPerformance
                     |
          +----------+----------+
          |                     |
       PRIMCA                STDBYCA
       PRIMARY          PHYSICAL STANDBY
          |                     |
    TRANSPORT-ON             APPLY-ON
          |                     |
        ASYNC            Real Time Query ON
                                |
                       Transport Lag: 0 sec
                       Apply Lag:     0 sec
The Broker configuration, Primary database, and Physical Standby all reported SUCCESS.
Useful DGMGRL Commands
Once Broker is configured, these commands provide a quick way to check the environment:
SHOW CONFIGURATION;

SHOW CONFIGURATION VERBOSE;

SHOW DATABASE PRIMCA;

SHOW DATABASE VERBOSE PRIMCA;

SHOW DATABASE STDBYCA;

SHOW DATABASE VERBOSE STDBYCA;
For day-to-day administration, this is one of the major advantages of Broker: database roles, transport/apply state, lag information, properties, and configuration status can be checked from a common management interface.
Conclusion
The process covered enabling Flashback Database, configuring Broker files in ASM, enabling DG_BROKER_START, creating the Broker configuration, adding the Physical Standby, enabling the configuration, and finally validating both databases through DGMGRL.
The final result in my lab was:
Configuration Status : SUCCESS

PRIMCA
Role                 : PRIMARY
Intended State       : TRANSPORT-ON
Database Status      : SUCCESS

STDBYCA
Role                 : PHYSICAL STANDBY
Intended State       : APPLY-ON
Transport Lag        : 0 seconds
Apply Lag            : 0 seconds
Real Time Query      : ON
Database Status      : SUCCESS
With Broker now managing the Data Guard environment, the next logical step is to test database role transitions.
📂 Detailed Installation Commands & Execution Output
The complete installation command sequence and actual execution output from the deployment are available on GitHub.
👉 Oracle 19c Data Guard Broker Configuration Commands & Execution Output