


Oracle 19c Standby & ADG — Your Smooth Configuration Journey
Oracle 19c Data Guard Series
This article is Part 1 of a 3-part Oracle 19c Data Guard series, based on my hands-on lab implementation.
The series covers the complete journey from building a Physical Standby database to managing and testing Data Guard role transitions.
📌 Series Roadmap
Part 1 — Build It – Physical Standby & Active Data Guard
➡️ This article covers the configuration of the Physical Standby database, RMAN Active Duplicate, Redo Transport, Redo Apply, and READ ONLY WITH APPLY.
Part 2 — Manage It – Data Guard Broker — Configure, Enable & Validate
➡️ Covers configuring Oracle Data Guard Broker using DGMGRL, adding the standby database, enabling the Broker configuration, and validating the environment.
Part 3 — Test It – Switchover, Failover & Reinstatement
➡️ Covers planned Switchover, Failover testing, handling the former primary database, Reinstatement, and final Data Guard validation.
Introduction
Oracle Data Guard is one of the key technologies used to provide database-level disaster recovery and high availability.
In this environment, I configured an Oracle 19c Physical Standby Database and enabled Active Data Guard, allowing the standby database to remain open for read-only workloads while Redo Apply continues.
The environment used in this setup:
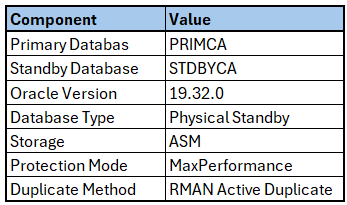
The overall flow was:

📂 Detailed Installation Commands & Output
This document focuses on the deployment approach, important configuration steps, troubleshooting and validation.
For readers who want to review the complete installation commands and actual command execution output, I have published the detailed command/output log separately on GitHub:
👉 Complete Oracle 19c Physical Standby & Active Data Guard Commands
⭐Quick Prerequisite Checklist
☑ Oracle 19c installed on both servers
☑ Same DB_NAME
☑ Unique DB_UNIQUE_NAME
☑ Primary database available
☑ ARCHIVELOG enabled
☑ ASM/storage available
☑ FRA configured
☑ FORCE LOGGING enabled
☑ Password file available on standby
☑ TNS connectivity working
☑ Listener running on both servers
☑ Static listener configured on standby
☑ Primary and standby can connect using SYSDBA
☑ Standby Redo Logs planned/configured
☑ Standby PFILE/SPFILE prepared
☑ RMAN connectivity verified
☑ Standby instance started in NOMOUNT
Once these prerequisites are validated, the actual Physical Standby and Active Data Guard configuration can begin.
1. Validate the Primary Database
Before creating the standby, verify the primary database role and mode.
SELECT NAME, OPEN_MODE, DATABASE_ROLE, LOG_MODE
FROM V$DATABASE;
Expected result:
NAME     OPEN_MODE   DATABASE_ROLE    LOG_MODE
-------- ----------- --------------- ----------
PRIMCA   READ WRITE  PRIMARY          ARCHIVELOG
The primary must be running in ARCHIVELOG mode.
2. Enable ARCHIVELOG Mode
If the database is not already in ARCHIVELOG mode:
SHUTDOWN IMMEDIATE;
STARTUP MOUNT;
ALTER DATABASE ARCHIVELOG;
ALTER DATABASE OPEN;
Verify:
SELECT LOG_MODE FROM V$DATABASE;3. Enable FORCE LOGGING
Force logging helps ensure that database changes are captured in redo.
ALTER DATABASE FORCE LOGGING;Verify:
SELECT FORCE_LOGGING FROM V$DATABASE;Expected:
FORCE_LOGGING
------------
YES
4. Configure the Fast Recovery Area
The standby configuration requires appropriate recovery storage.
Example:
ALTER SYSTEM SET DB_RECOVERY_FILE_DEST_SIZE=50G SCOPE=BOTH;
ALTER SYSTEM SET DB_RECOVERY_FILE_DEST='+FRA' SCOPE=BOTH;
Verify:
show parameter DB_RECOVERY_FILE_DEST;5. Configure Data Guard Parameters
Configure the Data Guard database names:
ALTER SYSTEM SET LOG_ARCHIVE_CONFIG='DG_CONFIG=(PRIMCA,STDBYCA)' SCOPE=BOTH;Configure automatic standby file management:
ALTER SYSTEM SET STANDBY_FILE_MANAGEMENT=AUTO SCOPE=BOTH;This allows files added to the primary database to be automatically created on the standby.
6. Configure Local Archive Destination
Configure the local archive destination:
ALTER SYSTEM SET LOG_ARCHIVE_DEST_1='LOCATION=USE_DB_RECOVERY_FILE_DEST VALID_FOR=(ALL_LOGFILES,ALL_ROLES) DB_UNIQUE_NAME=PRIMCA' SCOPE=BOTH;7. Configure Redo Transport to the Standby
Configure the remote archive destination:
ALTER SYSTEM SET LOG_ARCHIVE_DEST_2='SERVICE=STDBYCA ASYNC VALID_FOR=(ONLINE_LOGFILES,PRIMARY_ROLE) DB_UNIQUE_NAME=STDBYCA' SCOPE=BOTH;Verify:
show parameter LOG_ARCHIVE_DEST_2;At this point the primary knows where to send redo for the standby database.
8. Verify Primary Online Redo Logs
SELECT
    a.GROUP#,
    a.THREAD#,
    a.SEQUENCE#,
    a.ARCHIVED,
    a.STATUS,
    (a.BYTES/1024/1024) AS SIZE_MB
FROM v$log a
JOIN v$logfile b ON a.Group#=b.Group#
ORDER BY a.GROUP# ASC;
Result:
 GROUP#    THREAD#  SEQUENCE# ARC STATUS     SIZE_MB
---------- ---------- ---------- --- ---------- ----------
         5          1          1 YES INACTIVE    200
         5          1          1 YES INACTIVE    200
         6          1          2 NO  CURRENT     200
         6          1          2 NO  CURRENT     200
         7          1          0 YES UNUSED      200
         7          1          0 YES UNUSED      200
         8          1          0 YES UNUSED      200
         8          1          0 YES UNUSED      200

GROUP#  THREAD#  SEQUENCE# ARC STATUS           REDOLOG_FILE_NAME                         SIZE_MB
------  -------  ---------- --- ----------- -------------------------------------------------------
     5       1          1 YES INACTIVE     +DATA/PRIMCA/ONLINELOG/group_5.308.1243061391       200
     5       1          1 YES INACTIVE     +REDO/PRIMCA/ONLINELOG/group_5.309.1243061397       200
     6       1          2 YES CURRENT      +DATA/PRIMCA/ONLINELOG/group_6.309.1243061405       200
     6       1          2 YES CURRENT      +REDO/PRIMCA/ONLINELOG/group_6.310.1243061413       200
     7       1          0 YES UNUSED       +DATA/PRIMCA/ONLINELOG/group_7.310.1243061419       200
     7       1          0 YES UNUSED       +REDO/PRIMCA/ONLINELOG/group_7.311.1243061427       200
     8       1          0 YES UNUSED       +DATA/PRIMCA/ONLINELOG/group_8.311.1243061433       200
     8       1          0 YES UNUSED       +REDO/PRIMCA/ONLINELOG/group_8.312.1243061439       200
9. Configure Standby Redo Logs
Standby Redo Logs (SRLs) are essential for real-time apply in Oracle Data Guard. They allow the standby to receive redo directly from the primary and apply it immediately, without waiting for archived logs. This improves synchronization, reduces apply lag, and is essential for Active Data Guard and fast role transitions.
SRLs must be configured with one more log group than the number of online redo log groups on the primary. This ensures smooth log switching and uninterrupted redo transport during periods of high activity.
SRL count = ORL (online redo log groups) + 1
In my setup, the primary database has 4 online redo log groups, so the recommended number of SRLs is 5 (ORL + 1). I created 6 SRL groups, which is fully acceptable and provides additional flexibility during high redo activity.
ALTER DATABASE ADD STANDBY LOGFILE THREAD 1 GROUP 10 ( '+DATA', '+REDO' ) SIZE 200M ;
ALTER DATABASE ADD STANDBY LOGFILE THREAD 1 GROUP 11 ( '+DATA', '+REDO' ) SIZE 200M ;
ALTER DATABASE ADD STANDBY LOGFILE THREAD 1 GROUP 12 ( '+DATA', '+REDO' ) SIZE 200M ;
ALTER DATABASE ADD STANDBY LOGFILE THREAD 1 GROUP 13 ( '+DATA', '+REDO' ) SIZE 200M ;
ALTER DATABASE ADD STANDBY LOGFILE THREAD 1 GROUP 14 ( '+DATA', '+REDO' ) SIZE 200M ;
ALTER DATABASE ADD STANDBY LOGFILE THREAD 1 GROUP 15 ( '+DATA', '+REDO' ) SIZE 200M ;
Verify:
SELECT GROUP#, THREAD#, STATUS BYTES/1024/1024 MB FROM V$STANDBY_LOG ORDER BY GROUP#;Result:
GROUP#    THREAD#  SEQUENCE# ARC STATUS     REDOLOG_FILE_NAME                             SIZE_MB
------    -------- --------- --- ---------  --------------------------------------------- --------
     2          1        119 NO  CURRENT    +DATA/PRIMCA/ONLINELOG/group_2.290.1243050511     50
     3          1        117 YES INACTIVE   +DATA/PRIMCA/ONLINELOG/group_3.291.1243050515     50
     5          1          0 YES UNUSED     +DATA/PRIMCA/ONLINELOG/group_5.308.1243061391    200
     5          1          0 YES UNUSED     +REDO/PRIMCA/ONLINELOG/group_5.309.1243061397    200
     6          1          0 YES UNUSED     +DATA/PRIMCA/ONLINELOG/group_6.309.1243061405    200
     6          1          0 YES UNUSED     +REDO/PRIMCA/ONLINELOG/group_6.310.1243061413    200
     7          1          0 YES UNUSED     +DATA/PRIMCA/ONLINELOG/group_7.310.1243061419    200
     7          1          0 YES UNUSED     +REDO/PRIMCA/ONLINELOG/group_7.311.1243061427    200
     8          1          0 YES UNUSED     +DATA/PRIMCA/ONLINELOG/group_8.311.1243061433    200
     8          1          0 YES UNUSED     +REDO/PRIMCA/ONLINELOG/group_8.312.1243061439    200
10. Copy Password File from Primary to Standby
The password file must be available on the standby.
Copy the password file from the primary to the standby and make sure the appropriate Oracle ownership and permissions are maintained.
scp -i ~/.ssh/pr.key /u01/app/19.3.0/db/dbs/orapwPRIMCA oracle@<StandbyIP>:/u01/app/19.3.0/db/dbs/orapwSTDBYCA11. Create TNS Entries in both primary and standby servers
PRIMCA =
  (DESCRIPTION =
    (ADDRESS = (PROTOCOL = TCP)(HOST = <Primary_Hostname>)(PORT = 1521))
    (CONNECT_DATA =
      (SERVER = DEDICATED)
      (SERVICE_NAME = PRIMCA)
    )
  )

STDBYCA =
  (DESCRIPTION =
    (ADDRESS = (PROTOCOL = TCP)(HOST = <Standby_Hostname>)(PORT = 1521))
    (CONNECT_DATA =
      (SERVER = DEDICATED)
      (SERVICE_NAME = STDBYCA)
    )
  )
12. Configure a Static Listener on the Standby
Static listener entries are required on the standby server to ensure the standby database can be started, mounted, and managed by Oracle Clusterware or Data Guard Broker even when the instance is not yet running. Unlike dynamic registration, which depends on the database being open, static registration pre-defines the service name, SID, and Oracle Home in the listener configuration.
This allows tools such as RMAN Active Duplicate, Data Guard Broker and SRVCTL to connect to the standby instance reliably during creation, mount, recovery, or role transition operations. Static entries ensure consistent connectivity and eliminate issues where the standby instance cannot register itself dynamically because it is not yet open.
vi /u01/app/19.3.0/grid/network/admin/listener.ora

SID_LIST_LISTENER =
  (SID_LIST =
    (SID_DESC =
        (GLOBAL_DBNAME = STDBYCA)
        (ORACLE_HOME = /u01/app/19.3.0/db)
        (SID_NAME = STDBYCA)
     )
  )
Verify that the listener is running and reachable.
13. Verify Network Connectivity
Verify TNS connectivity from both servers.
[oracle@caoradb05 ~]$ tnsping PRIMCA
Attempting to contact (DESCRIPTION = (ADDRESS = (PROTOCOL = TCP)(HOST = <Primary_Hostname>)(PORT = 1521)) (CONNECT_DATA = (SERVER = DEDICATED) (SERVICE_NAME = PRIMCA)))
OK (0 msec)

[oracle@caoradb04 ~]$ tnsping STDBYCA
Attempting to contact (DESCRIPTION = (ADDRESS = (PROTOCOL = TCP)(HOST = <Standby_Hostname>)(PORT = 1521)) (CONNECT_DATA = (SERVER = DEDICATED) (SERVICE_NAME = STDBYCA)))
OK (0 msec)
Also test SQL*Net connectivity:
[oracle@caoradb05 ~]$ sqlplus sys/<password>@PRIMCA as sysdba
[oracle@caoradb04 ~]$ sqlplus sys/<password>@STDBYCA as sysdba
Both directions should be working before proceeding.
14. Create Primary PFile for Standby
SQL> create pfile='/u01/app/oracle/dba/initprim.ora' from spfile;

File created.

cat /u01/app/oracle/dba/initprim.ora

*.audit_file_dest='/u01/app/oracle/admin/PRIMCA/adump'
*.audit_trail='db'
*.compatible='19.0.0'
*.control_files='+DATA/PRIMCA/CONTROLFILE/current.288.1243050511'
*.db_block_size=8192
*.db_create_file_dest='+DATA'
*.db_create_online_log_dest_1='+DATA'
*.db_name='PRIMCA'
*.db_recovery_file_dest='+REDO'
*.db_recovery_file_dest_size=20g
*.diagnostic_dest='/u01/app/oracle'
*.dispatchers='(PROTOCOL=TCP) (SERVICE=PRIMCAXDB)'
*.enable_pluggable_database=true
*.local_listener='LISTENER_PRIMCA'
*.log_archive_config='dg_config=(PRIMCA,STDBYCA)'
*.log_archive_dest_1='location=use_db_recovery_file_dest valid_for=(all_logfiles,all_roles) db_unique_name=PRIMCA'
*.log_archive_dest_2='service=STDBYCA async valid_for=(online_logfiles,primary_role) db_unique_name=STDBYCA'
*.log_archive_format='%t_%s_%r.dbf'
*.nls_language='ENGLISH'
*.nls_territory='AMERICA'
*.open_cursors=300
*.pga_aggregate_target=512m
*.processes=300
*.remote_login_passwordfile='EXCLUSIVE'
*.sga_target=5g
*.standby_file_management='AUTO'
*.undo_tablespace='UNDOTBS1'
15. Create audit directory in Standby Server
mkdir -p /u01/app/oracle/admin/STDBYCA/adump16. Prepare the Standby Database
Create the required standby initialization parameter file.
[oracle@caoradb05 chakri]$ cat initstdbyca.ora
*.audit_file_dest='/u01/app/oracle/admin/STDBYCA/adump'
*.audit_trail='db'
*.compatible='19.0.0'
*.control_files='+DATA/STDBYCA/CONTROLFILE/current.288.1243050511'
*.db_create_file_dest='+DATA'
*.db_create_online_log_dest_1='+DATA'
*.db_name='PRIMCA'
*.db_unique_name='STDBYCA'
*.db_recovery_file_dest='+REDO'
*.db_recovery_file_dest_size=20g
*.diagnostic_dest='/u01/app/oracle'
*.log_archive_config='dg_config=(PRIMCA,STDBYCA)'
*.log_archive_dest_1='location=use_db_recovery_file_dest valid_for=(all_logfiles,all_roles) db_unique_name=STDBYCA'
*.log_archive_dest_2='service=PRIMCA async valid_for=(online_logfiles,primary_role) db_unique_name=PRIMCA'
...................
Start the standby instance in NOMOUNT:
CREATE SPFILE FROM PFILE='<standby_pfile>';
STARTUP NOMOUNT;
Expected:
ORACLE instance started.

Total System Global Area 5368706880 bytes
Fixed Size                  9189184 bytes
Variable Size             989855744 bytes
Database Buffers         4362076160 bytes
Redo Buffers                7585792 bytes
17. Create the Physical Standby Using RMAN Active Duplicate.
I created both the RMAN command script and the execution script, then executed them with nohup to ensure the job ran reliably in the background, even during network disconnects.
From the standby server, connect to RMAN:
rman target sys/<password>@PRIMCA auxiliary sys/<password>@STDBYCAThen execute the active duplicate:
run
{
allocate channel c1 type disk;
allocate channel c2 type disk;
allocate channel c3 type disk;
allocate channel c4 type disk;
allocate auxiliary channel stby1 type disk;
allocate auxiliary channel stby2 type disk;
allocate auxiliary channel stby3 type disk;
allocate auxiliary channel stby4 type disk;
allocate auxiliary channel stby5 type disk;
}
RMAN copies the database directly from the primary and creates the standby database.
The important part of this process is that the standby is created from the current primary database rather than requiring a separate backup/restore workflow.
After the duplicate completes, validate the database role.
18. Validate the Standby Database
Connect to the standby:
select name, db_unique_name, database_role, open_mode, SWITCHOVER_STATUS FROM gV$DATABASE;Expected role:
NAME     DB_UNIQUE_NAME  DATABASE_ROLE      OPEN_MODE
-------  --------------- ----------------   ------------
PRIMCA    STDBYCA        PHYSICAL STANDBY   MOUNTED
19. Start Redo Apply
Before Apply Switchover Status is in Recovery Need
select name, db_unique_name, database_role, open_mode, SWITCHOVER_STATUS FROM gV$DATABASE;

NAME     DB_UNIQUE_NAME  DATABASE_ROLE      OPEN_MODE    SWITCHOVER_STATUS
-------  --------------- ----------------   ------------ -----------------
PRIMCA    STDBYCA        PHYSICAL STANDBY   MOUNTED      RECOVERY NEEDED
Start managed recovery:
ALTER DATABASE RECOVER MANAGED STANDBY DATABASE USING CURRENT LOGFILE DISCONNECT FROM SESSION;Check the MRP process:
[oracle@caoradb05 ~]$ ps -ef | grep mrp
oracle     28974       1  0 07:26 ?        00:00:00 ora_mrp0_STDBYCA
Verify recovery:
SELECT PROCESS,
       STATUS,
       SEQUENCE#,
       BLOCKS,
       BLOCK#,
       THREAD#
FROM V$MANAGED_STANDBY;
You should see processes associated with redo transport and redo apply.
Result:
PROCESS   STATUS        SEQUENCE#     BLOCKS     BLOCK#    THREAD#
--------- ------------ ---------- ---------- ---------- ----------
DGRD      ALLOCATED             0          0          0          0
DGRD      ALLOCATED             0          0          0          0
ARCH      CLOSING             123        211          1          1
MRP0      APPLYING_LOG        124     409600        321          1
20. Monitor the Redo Apply Process after Starting
Checking the Standby Redo Logs:
 GROUP#    THREAD#  SEQUENCE# ARC STATUS       SIZE_MB
---------- ---------- ---------- --- ---------- ----------
        10          1        123 YES ACTIVE            200
        11          1          0 YES UNASSIGNED        200
        12          1          0 YES UNASSIGNED        200
        13          1          0 YES UNASSIGNED        200
        14          1          0 YES UNASSIGNED        200
        15          1          0 YES UNASSIGNED        200

6 rows selected.

SQL> /

    GROUP#    THREAD#  SEQUENCE# ARC STATUS        SIZE_MB
---------- ---------- ---------- --- ---------- ----------
        10          1        124 YES ACTIVE            200
        11          1          0 YES UNASSIGNED        200
        12          1          0 YES UNASSIGNED        200
        13          1          0 YES UNASSIGNED        200
        14          1          0 YES UNASSIGNED        200
        15          1          0 YES UNASSIGNED        200
Dataguard Process:
SQL> SELECT ROLE, THREAD#, SEQUENCE#, ACTION FROM V$DATAGUARD_PROCESS;

ROLE                        THREAD#  SEQUENCE# ACTION
------------------------ ---------- ---------- ------------
post role transition              0          0 IDLE
RFS async                         1        124 IDLE
archive redo                      0          0 IDLE
archive redo                      0          0 IDLE
archive redo                      0          0 IDLE
recovery apply slave              0          0 APPLYING_LOG
RFS ping                          1        124 IDLE
redo transport timer              0          0 IDLE
managed recovery                  0          0 IDLE
RFS archive                       0          0 IDLE
archive local                     0          0 IDLE

ROLE                        THREAD#  SEQUENCE# ACTION
------------------------ ---------- ---------- ------------
recovery apply slave              0          0 APPLYING_LOG
recovery apply slave              0          0 APPLYING_LOG
gap manager                       0          0 IDLE
recovery apply slave              0          0 APPLYING_LOG
redo transport monitor            0          0 IDLE
log writer                        0          0 IDLE
recovery logmerger                1        124 APPLYING_LOG
recovery apply slave              0          0 APPLYING_LOG
recovery apply slave              0          0 APPLYING_LOG
recovery apply slave              0          0 APPLYING_LOG
recovery apply slave              0          0 APPLYING_LOG

22 rows selected.
Dataguard Stats:
SQL> SELECT NAME, VALUE FROM V$DATAGUARD_STATS WHERE NAME LIKE '%lag%';

NAME                 VALUE
-------------------- ------------------------------
transport lag        +00 00:00:00
apply lag            +00 00:00:00
21. Generate Redo on the Primary
Perform a log switch on the primary:
ALTER SYSTEM SWITCH LOGFILE;You can perform additional switches when testing redo transport.
On the standby, monitor:
SELECT PROCESS,
       STATUS,
       THREAD#,
       SEQUENCE#
FROM V$MANAGED_STANDBY;
22. Stop the Redo Apply
SQL> ALTER DATABASE RECOVER MANAGED STANDBY DATABASE CANCEL;23. Migrating the Standby SPFILE from Filesystem to ASM
It is a best practice to migrate the standby SPFILE from the filesystem into ASM. Storing the SPFILE in ASM provides improved redundancy, centralized storage management, and consistency with the primary database—especially in RAC or ASM‑managed environments.
SQL> show parameter spfile

NAME             TYPE        VALUE
---------------- ----------- ------------------------------
spfile           string      /u01/app/19.3.0/db/dbs/spfileSTDBYCA.ora

SQL> create pfile='/u01/app/oracle/dba/initSTDBYCA.ora' from spfile;

File created.

SQL> host mv /u01/app/19.3.0/db/dbs/spfileSTDBYCA.ora /u01/app/19.3.0/db/dbs/spfileSTDBYCA.orabkp

SQL> create spfile='+DATA/STDBYCA/spfileSTDBYCA.ora' from pfile='/u01/app/oracle/dba/initSTDBYCA.ora';

File created.

SQL> host echo SPFILE='+DATA/STDBYCA/spfileSTDBYCA.ora' > /u01/app/19.3.0/db/dbs/initSTDBYCA.ora

SQL> startup mount;
ORACLE instance started.

Total System Global Area 5368706880 bytes
Fixed Size                  9189184 bytes
Variable Size             989855744 bytes
Database Buffers         4362076160 bytes
Redo Buffers                7585792 bytes
Database mounted.

SQL> show parameter spfile

NAME                      TYPE      VALUE
------------------------- --------- ------------------------------
spfile                    string    +DATA/STDBYCA/spfilestdbyca.ora
This step ensures that both primary and standby use ASM‑managed parameter files, simplifying administration and supporting smooth Data Guard Broker operations, role transitions, and future maintenance.
24. Register the standby database as a resource in the Oracle Clusterware.
After creating the standby database, it must be registered as a managed resource in Oracle Clusterware. This step ensures that the standby instance is fully integrated into the cluster’s management allowing Clusterware to start, stop, monitor and maintain the standby database just like the primary.
[oracle@caoradb05 ~]$ $ORACLE_HOME/bin/srvctl add database -d STDBYCA -o $ORACLE_HOME -p '+DATA/STDBYCA/spfileSTDBYCA.ora' -r physical_standby -s mount -y AUTOMATIC -a "DATA,REDO,FRA"

[oracle@caoradb05 ~]$ $ORACLE_HOME/bin/srvctl modify database -d STDBYCA -startoption "READ ONLY"
[oracle@caoradb05 ~]$ $ORACLE_HOME/bin/srvctl config database -d STDBYCA
Result:
Database unique name: STDBYCA
Database name:
Oracle home: /u01/app/19.3.0/db
Oracle user: oracle
Spfile: +DATA/STDBYCA/spfileSTDBYCA.ora
Password file:
Domain:
Start options: read only
Stop options: immediate
Database role: PHYSICAL_STANDBY
Management policy: AUTOMATIC
Disk Groups: DATA,REDO,FRA
Services:
OSDBA group: oinstall
OSOPER group:
Database instance: STDBYCA
Once the database is registered, we use SRVCTL for all startup and shutdown actions rather than managing them manually.
SQL> shutdown immediate
ORA-01109: database not open


Database dismounted.
ORACLE instance shut down.

[oracle@caoradb05 ~]$ srvctl start database -d STDBYCA
25. Validate Standby Database
Before Starting MRP Process, Open Mode is just READ ONLY
SQL> set line 200
SQL> select name, db_unique_name, database_role, open_mode FROM gV$DATABASE;

NAME       DB_UNIQUE_NAME  DATABASE_ROLE     OPEN_MODE
---------  --------------  --------------    -----------
PRIMCA     STDBYCA         PHYSICAL STANDBY  READ ONLY
After Start MRP, Open Mode will change READ ONLY WITH APPLY
SQL> set line 200
SQL> select name, db_unique_name, database_role, open_mode FROM gV$DATABASE;

NAME       DB_UNIQUE_NAME  DATABASE_ROLE     OPEN_MODE
---------  --------------  --------------    --------------------
PRIMCA     STDBYCA         PHYSICAL STANDBY  READ ONLY WITH APPLY
This confirms that the physical standby is open for read-only access while redo is being applied.
26. Final Validation
Primary
SELECT NAME, DB_UNIQUE_NAME,
       OPEN_MODE,
       DATABASE_ROLE,
       LOG_MODE
FROM V$DATABASE;
Expected:
PRIMCA
PRIMCA
READ WRITE
PRIMARY
ARCHIVELOG
Standby
SELECT NAME, DB_UNIQUE_NAME,
       OPEN_MODE,
       DATABASE_ROLE
FROM V$DATABASE;
Expected:
PRIMCA
STDBYCA
READ ONLY WITH APPLY
PHYSICAL STANDBY
Standby Recovery
SELECT PROCESS,
       PID,
       STATUS,
       THREAD#,
       SEQUENCE#
FROM V$MANAGED_STANDBY;
Result:
PROCESS   PID                      STATUS        SEQUENCE#     BLOCKS
--------- ------------------------ ------------ ---------- ----------
ARCH      38647                    CLOSING             125          1
DGRD      38649                    ALLOCATED             0          0
DGRD      38651                    ALLOCATED             0          0
ARCH      38657                    CLOSING             124          1
MRP0      39289                    APPLYING_LOG        126          1
Redo Transport
Generate a manual redo switch on the primary to test:
ALTER SYSTEM SWITCH LOGFILE;Then verify that the standby receives and applies the redo.
Check the Cluster Resources
[oracle@caoradb05 ~]$ /u01/app/19.3.0/grid/bin/crsctl stat res -init -t
--------------------------------------------------------------------------
Name           Target  State        Server       State details
--------------------------------------------------------------------------
Local Resources
--------------------------------------------------------------------------
ora.DATA.dg        ONLINE  ONLINE       caoradb05    STABLE
ora.FRA.dg         ONLINE  ONLINE       caoradb05    STABLE
ora.LISTENER.lsnr  ONLINE  ONLINE       caoradb05    STABLE
ora.REDO.dg        ONLINE  ONLINE       caoradb05    STABLE
ora.VOTK.dg        ONLINE  ONLINE       caoradb05    STABLE
ora.asm            ONLINE  ONLINE       caoradb05    Started,STABLE
ora.ons            OFFLINE OFFLINE      caoradb05    STABLE
--------------------------------------------------------------------------
Cluster Resources
--------------------------------------------------------------------------
ora.cssd  1        ONLINE  ONLINE       caoradb05    STABLE
ora.diskmon  1     OFFLINE OFFLINE                   STABLE
ora.evmd  1        ONLINE  ONLINE       caoradb05    STABLE
ora.stdbyca.db 1   ONLINE  ONLINE       caoradb05    Open,Readonly,HOME=/
                                                     u01/app/19.3.0/db,ST
                                                     ABLE
--------------------------------------------------------------------------
Complete Build Flow
The complete implementation can be summarized as:
Primary Database
      |
      | ARCHIVELOG
      | FORCE LOGGING
      | Data Guard parameters
      | Standby Redo Logs
      | Network / TNS
      |
      v
RMAN ACTIVE DUPLICATE
      |
      v
Physical Standby
      |
      | Managed Recovery
      |
      v
Redo Apply
      |
      v
READ ONLY WITH APPLY
      |
      v
Active Data Guard
Conclusion
This document demonstrates the complete process of building an Oracle 19c Physical Standby Database and enabling Active Data Guard.
Starting with the primary database configuration, the setup covered:
- ARCHIVELOG and FORCE LOGGING
- Fast Recovery Area configuration
- Data Guard initialization parameters
- Redo transport configuration
- Standby Redo Logs
- Password file and TNS connectivity
- Static listener configuration
- Standby database preparation
- RMAN Active Duplicate
- Managed Redo Apply
- Redo transport and apply validation
- Opening the standby as READ ONLY WITH APPLY
The final environment was:
PRIMCA
PRIMARY
READ WRITE
    |
    |  Redo Transport
    v
STDBYCA
PHYSICAL STANDBY
READ ONLY WITH APPLY
The important takeaway from this setup is that creating a standby database is only the beginning. The configuration needs to be validated end-to-end — from redo generation on the primary, through redo transport, to redo apply on the standby.
Once the physical standby was working correctly and redo was being applied, the environment was ready for the next step: centralized Data Guard management using Data Guard Broker.
The command-by-command installation and execution output from the actual implementation can be maintained separately as a troubleshooting/reference log. This makes the article easier to read while still providing the complete technical evidence for anyone who wants to reproduce the setup.
📂 Detailed Installation Commands & Execution Output
The complete installation command sequence and actual execution output from the deployment are available on GitHub.
👉 Oracle 19c Physical Standby & Active Data Guard Commands & Execution Output